Paper Crafting Blog Hop – Punches!

Welcome to our September Paper Crafting Blog Hop with Independent Stampin’ Up! Demonstrators from all over the world! Each demonstrator is featuring a project using punches!

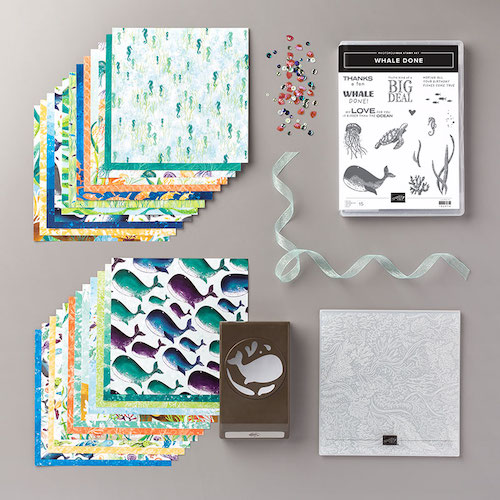
You may have arrived here from Tracy’s blog. She had a fabulous project! I chose the Beautiful Autumn Bundle (#155189) because it has the Beautiful Autumn Stamp Set (#153450) and the Autumn Punch Pack (#153609).

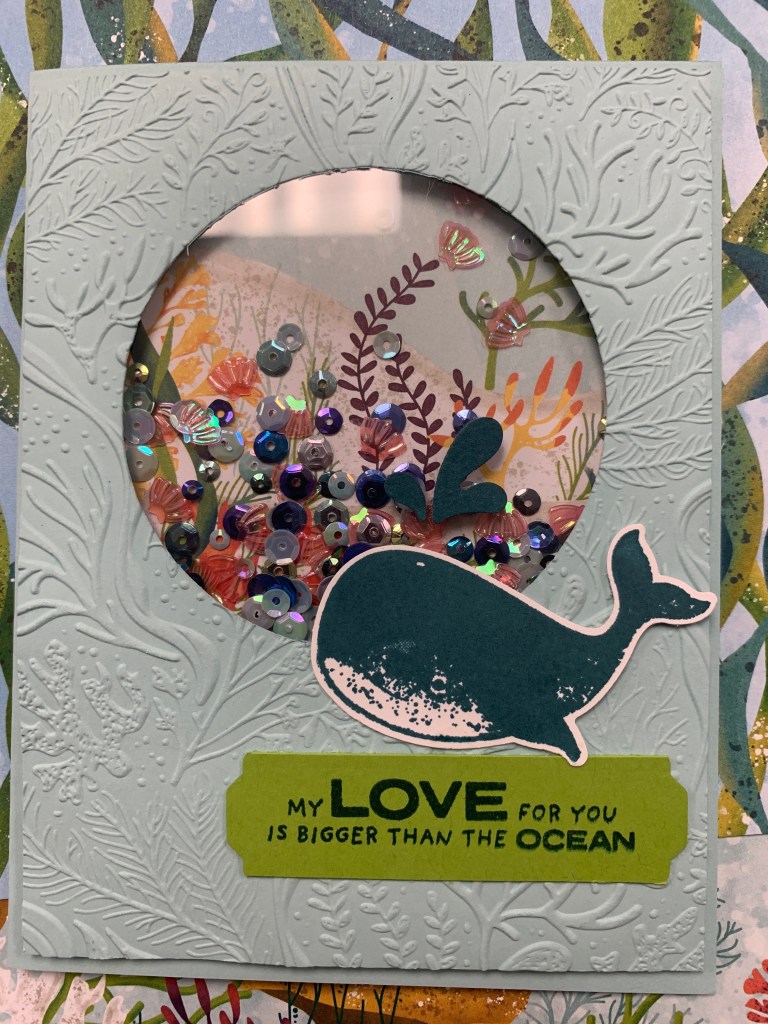
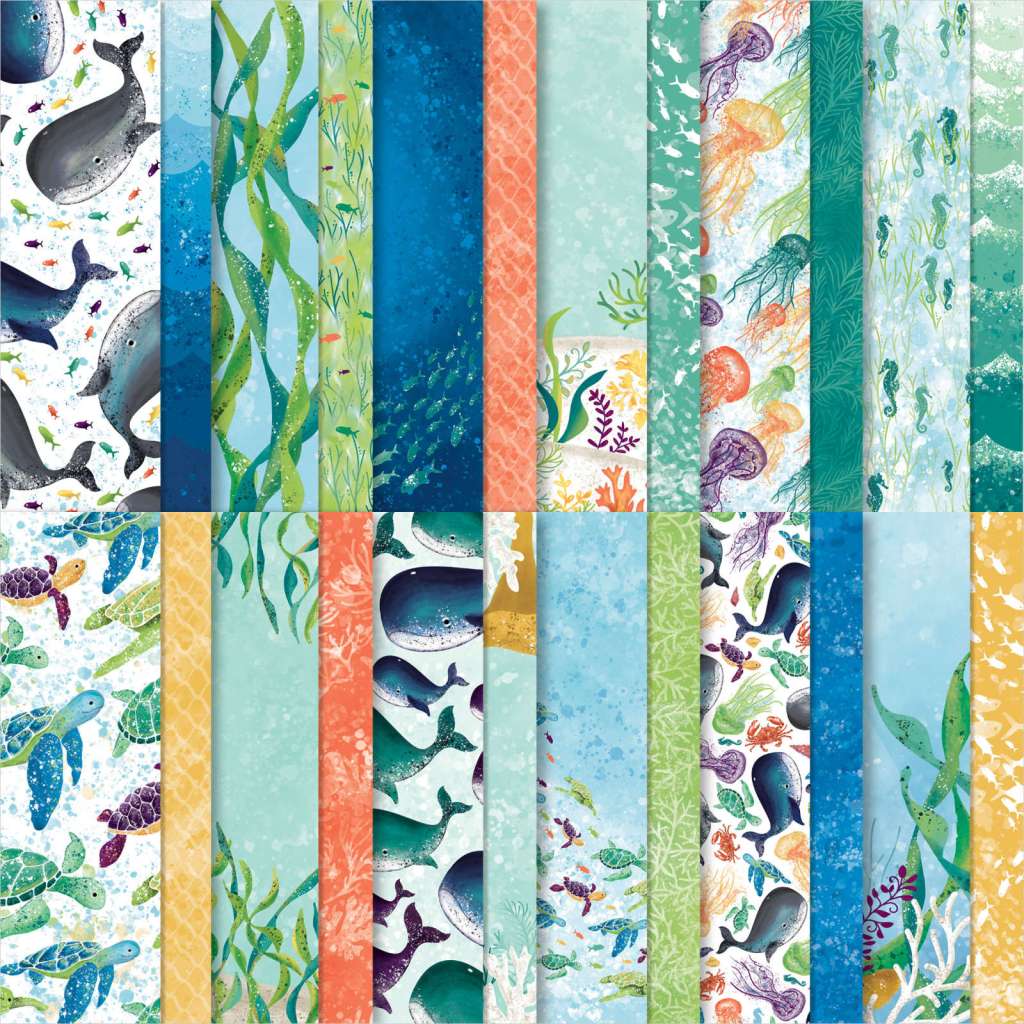
I started my card on a Cajun Craze card base with a layer of crumb cake under a layer of gorgeous paper from the Gilded Autumn Specialty DSP (#153520).

I cut a circle in the DSP with the Layering Circle Dies (#151770) and inserted a piece of Very Vanilla cut with the same die. The Very Vanilla is popped up on dimensionals and then surrounded with leaves and acorns stamped in Cajun Craze, Mint Macaron, and Crumb Cake. The sentiment is stamped in Mint Macaroon, too.

I finished off the card with two pieces of ribbon from the Basket Weave & Metallic Ribbon Combo Pack (#153553). They are Copper and Mint Macaron.

All bloggers in this month’s hop:
Shirley Merker
Tracy Held
Sue Boerner <— You are here!
Terri Stewart
Katie Johnson
Krissi Hannahs
Sandra Roberts
Sue McDonald
Sandy Ward
Maureen Rauchfuss
Annette McMillan

I hope you found some inspiration for your next Stampin’ project using the Beautiful Autumn Bundle! 

My Events calendar has been updated with my online Mystery Stamping and in-person Stamping Buffets. Mystery Stamping is on Monday each week. All supplies used to make my card above can be ordered through my online store. Please use the host code found on the right-hand side of my blog when ordering, if your order is under $150. If it is over $150, don’t use the code so you can redeem all the host rewards.

If you do not already have a Stampin’ Up! Demonstrator, I would be happy to be yours. Ready to enjoy the demonstrator discount? Click the Contact Me button above.

Stampin’ Cut & Emboss Machine

Is available for purchase on September 1st. Some of the new features are:
Wide 6″ platform for all your crafting needs. Weighs approximately 8.1 pounds. Platform folds to make transporting easy and to take up less space when storing. Works with all Stampin’ Cut & Emboss dies and embossing folders. Simple to make a sandwich. Includes plates that are labeled with a number and are color coded for easy use. All the plates you need to get started are included: 1 Base Plate (Plate 1), 1 Die Plate (Plate 2), 2 Cutting Plates (Plate 3), and 1 Specialty Plate (Plate 4). Great for seasoned crafters who want a solution for all their die cutting and embossing needs.

Mini Stampin’ Cut & Emboss Machine:

Available by the end of the year. Smaller 3-1/2″ platform for your on-the-go crafting options. Weighs approximately 2.7 pounds. Lightweight, compact, and portable. Platform folds to make transporting easy and to take up less space when storing. Works with Stampin’ Cut & Emboss dies and embossing folders that are narrower than 3-3/8″. Dies and embossing folders that are compatible with the Mini Stampin’ Cut & Emboss Machine are indicated in the product description in our catalogs and online store. Simple to make a sandwich. Includes plates that are labeled with a number and are color coded for easy use. All the plates you need to get started are included: 1 Mini Base Plate (Plate 1), 2 Mini Cutting Plates (Plate 2), 1 Mini Embossing Plate (Plate 3), and 1 Mini 3D Embossing Plate (Plate 4).  Note: 3D embossing folders that are compatible with the mini machine are not part of our initial product launch, however we anticipate being able to add these to our product offering later in 2021. Perfect for new or casual crafters who want a smaller machine that offers a high-quality die-cutting and embossing experience. It’s also great for all crafters who like to create on the go.

Contact me you would like to get in on a pre-order and I will place an order on September 2nd for you.

Scrap Card Saturday

Saturday Scrap card! Scrapbookers who want to make a quick card or Stampers who want to use up Designer Series Paper, Saturday morning posts are for you!

The base is 5 1/2″ x 4 1/4″ with a layer of Designer Series Paper measuring 5 1/4″ x 4″. Cut another piece of yardstick, the same as the base, 8-1/2″ x 3-1/4″, scored @ 4-1/4. Adhere this in the middle of the card base, over the DSP layer. Cut a piece of DSP, a different pattern-coordinating with first DSP, 3′ x 4′. Cut an inside white insert, 3 x 4. Add a stitched oval or other shape, 2″ x 3″. Add ribbon or other embellishment to the front.

August Paper Crafting Blog Hop!

Welcome to our August Paper Crafting Blog Hop with Independent Stampin’ Up! Demonstrators from all over the globe! Each demonstrator is featuring a different Suite of Products this month!

You may have arrived here from Tracy’s blog. She had a fabulous project! I chose the Whale of Time Suite Collection (#154126).

The Whale of a Time Suite includes:

  • Whale Done Photopolymer Stamp Set (10% off)
  • Whale of a Time 6″ x 6″ Designer Series Paper
  • Whale of a Time Sequins
  • Pool Party 3/8″ Sheer Ribbon
  • Whale Punch (10% off)
  • Seabed 3D Embossing Folder
  • To order, add item #154126 to your order

Such a great value, all of the products shown above for $65.50!

I started my card on a Pool Party card base with a layer embossed with Seabed 3D Embossing Folder (#152700) after a circle was cut with the Layering Circles Dies (#151770).

Next, I adhered a piece of Window Sheets (#142314) to the back of the embossed panel. Then I surrounded the opening with Adhesive Foam Strips (#141825) making sure there were no gaps. I then added Whale Of A Time Sequins (#152461) inside the Foam Strips. I carefully pulled off the backing on the Foam Strips and adhered a piece of the Whale Of A Time Designer Series Paper (#152460) and then adhered the panel to the card base with Stampin’ Dimensionals (#104430) supporting the bottom of the panel.

That adorable whale was stamped in Pretty Peacock and punched out with the Whale Punch (#(152699). The water splashes were punched from a scrap of Pretty Peacock. The sentiment from the Whale Done Photopolymer Stamp Set (#152470) was stamped in Pretty Peacock on a scrap of Granny Apple Green. This card will be headed to my granddaughter!

Isn’t the Whale of a Time DSP adorable?

All bloggers in this month’s hop:
Shirley Merker
Tracy Held
Sue Boerner
Terri Stewart
Krissi Hannahs
Carol Payne
Sandra Roberts
Sandy Ward
Cindi Pratt
Maureen Rauchfuss
Annette McMillan

I hope you found some inspiration for your next Stampin’ project using the Whale Done Suite! The stamp set and punch are available in the Whale Done Bundle (#154053), too.

My Events calendar has been updated with my online Mystery Stamping and in-person Stamping Buffets. Mystery Stamping is on Monday each week. All supplies used to make my card above can be ordered through my online store. Please use the host code JB9999EB when ordering, if your order is under $150. If it is over $150, don’t use the code so you can redeem all the host rewards.

If you do not already have a Stampin’ Up! Demonstrator, I would be happy to be yours. Ready to enjoy the demonstrator discount? Click the Contact Me button above.

Oops!

I accidentally ordered 2 of these bundles. My mistake gives you the opportunity to have it for $50, instead of the $52.67 it would be to order it on your own. First to comment they want it, gets it.

Scrap Card Saturday

Saturday Scrap card! Scrapbookers who want to make a quick card or Stampers who want to use up Designer Series Paper, Saturday morning posts are for you!

Take a variety of patterned and solid papers and cut 1″ x 5-1/4″ rectangles. The simplest way to make the card is diagonally cut each rectangle and then alternate them across the card. You can cut other smaller pieces, but start out simple!

Scrap Card Saturday

Saturday Scrap card! Scrapbookers who want to make a quick card or Stampers who want to use up Designer Series Paper, Saturday morning posts are for you!

The two papers at the top are 4″ in length and the left one is 2-7/8” in width and the right one is 1-1/8”. The bottom two papers are1-1/8″ in height and the left is 1-18″ wide and the right is2-7/8″ wide. Circle punches or dies or the sentiment and the mat and there’s your card!

July Paper Crafting Blog Hop!

Welcome to our July Paper Crafting Blog Hop with Independent Stampin’ Up! Demonstrators from all over the globe! Our theme this month is our lovely Designer Series Paper! DSP for short!

You may have arrived from Tracy’s blog. She had a fabulous project! I chose the Playing With Patterns 6″x6″ DSP (#152490). This is a great card to use up scraps. I cut 3 sets of 6″ x 1/2″ strips from 6 pieces of patterned paper. You can use both sides of 3 pieces of DSP or a total of 4 or 5 patterns, it is all up to you!! Take a piece of Whisper White or Very Vanilla cardstock cut at 5 1/4″ x 4″. This will be cut down to 5″ x 3 3/4″ after the strips are adhered. Start by adhering 2 long strips of DSP diagonally across the card. Next take 2 different pieces and place them at a 90 degree angle or perpendicular to the first piece, in about the middle of the first piece. then alternate 2 pieces in each direction to the edges. Trim off the excess ends, they can be used to fill in small sections. Cut the finished piece to 5″ x 3 3/4″.

The card base is Calypso Coral with a layer of Night of Navy on top. That layer is 5 1/8″ x 3 7/8″. To keep with the angular theme of the card I used the Stitched Nested Labels Dies (#149638) for the sentiment from the Itty Bitty Birthdays cling stamp set (#148618). Happy was stamped in Night of Navy and Birthday was stamped inside the card.

If using a floral Designer Series Paper, you can emboss the DSP layer to give it a quilted look before adhering it to the 2 other layers.

All bloggers in this month’s hop:
Shirley Merker
Tracy Held
Sue Boerner < — You are here!
Terri Stewart
Krissi Hannahs
Debbie McNeill
Katie Johnson
Sandra Roberts
Sandy Ward
Sue McDonald
Maureen Rauchfuss
Annette McMillan

I hope you found some inspiration for your next Stampin’ project using Designer Series Paper! My Events calendar has been updated with my online Mystery Stamping and in-person Stamping Buffets. Mystery Stamping is on Monday each week. All the supplies used to make the card above can be ordered through my online store. Please use the host code TA36XWEN when ordering, if your order is under $150. If it is over $150, don’t use the code so you can redeem all the host rewards.

If you do not already have a Stampin’ Up! Demonstrator, I would be happy to be yours. Ready to enjoy the demonstrator discount? Click the Contact Me button above.

Scrap Card Saturday

Saturday Scrap card! Scrapbookers who want to make a quick card or Stampers who want to use up Designer Series Paper, Saturday morning posts are for you!

5-1/4” x 4” two-sided paper, cut at 2-1/2” from the left. Then cut the wide panel 3” up from the bottom and cut the 1-1/2” strip, 2” from the bottom. Flip alternate rectangles. Add a sticker or sentiment and you’re done.